The Minecraft update we’ve all been waiting for is finally here! At least the snapshot is. I’m EwokPilot65 and this is the ultimate guide to the 1.16 Nether biome: The Soul Sand Valley.
Nether update
The Soulsand Valley is one of the exciting new biomes added in the new 1.16 Nether update snapshots. So, without further ado; lets get right into it.
Soul Sand Valley
The Soul sand valley is a barren and desolate landscape filled with hundreds upon hundreds of soul sand and soul soil blocks.
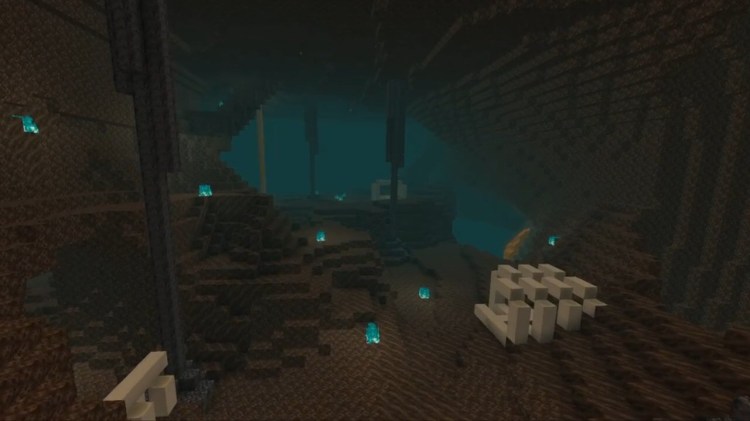
The Eerie Soul Sand Valley
From the eerie blue fires to the gigantic skeleton fossils, this biome is perhaps one of the spookiest in the game so far. It’s also the most dangerous biome in the nether alongside the Basalt Delta. Heck, it might even be the most dangerous biome in the whole game! This is because it’s filled with skeletons and ghasts! All in all, not a very pleasant place.
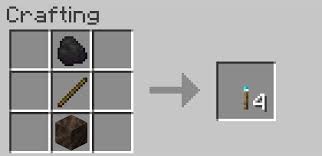
That’s right. I said blue fires. In the 1.16 update, a new block was added: the soul soil block. This block is similiar in looks to soul sand, but doesn’t slow you down and has a slightly different texture. But here comes the real interesting part: when you set fire to this block, the fire turns blue! There are also some crafting recipes for soul soil shown below.
Blue Fire
As for the vegetation; this biome has none. But it does have some never-before seen blocks including Soul soil and basalt blocks. It is also the only biome in the nether where Bone blocks are found!
Some interesting facts about this biome are:
It’s the most dangerous biome in the nether because of the abundance in skeletons and ghasts that spawn there!
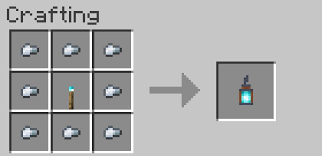
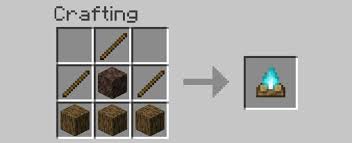
The new block introduced- soul soil- will produce blue flames or soul flames when set on fire. This block can also be used used to craft soul fire torches which can then be crafted into soul fire lanterns! You can even craft soul campfires! Crafting recipes are as follows:
Bone blocks are most commonly found in Soul Sand Valleys In the form of skeletal remains.
There are new pillar like structures that run from the roof to the bottom of the soulsand valley. These stalagmites are made of a new block called “Basalt”
Basalt Stalagmites
The fog in the Soulsand Valley takes an eerie blue colour
This Biome has a new soundtrack composed by Lena Raine called “So Below” that adds to the distant and eerie feel of the biome.
That’s All!
Thanks for reading till the end! I’m really sorry about the huge gap in uploads on this blog. The next post will be released in under a week from now. Have a good day!
You can send feedback emails to ewokgamingfeedback@gmail.com. You can also support this blog by following from the home the home page if you haven’t already; It’s free! That’s all for now; see you in the next one
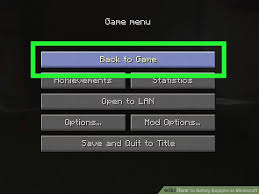
Last time, we survived our first night, acquired stone tools and carved a small base into the side of a mountain (We also got some food and a bed). This time we’re going to learn the basics of mining and get some Iron (And maybe diamond) tools and armor. So open up Minecraft, enter your world, and hit the resume button
So we’ve already survived our first night, Now it’s time to survive a few million more. The first thing to do now is go mining. Iron is an essential material for weapons, armor, tools and other stuff. Here are the basics of mining:
Step four: mining
Note: when you are going mining, make sure you have enough torches. This is the crafting recipe:
1. Staircase mining.
This step requires you to go to the back of your hill base, face the wall at the back and start digging out a staircase that descends down into the ground, just like this:
Dig a staircase
While digging, be on the look out for ores. That’s the whole point of this. At the end of this step there will be an index of all the pickaxes and the blocks/ores you can mine with them. So if you see a ore you don’t recognize, be sure to look at the index before mining it. When you reach bedrock (which is the bottom end of the world), either go another location and start another staircase mine or go to a random location on your staircase and start strip mining as shown down below:
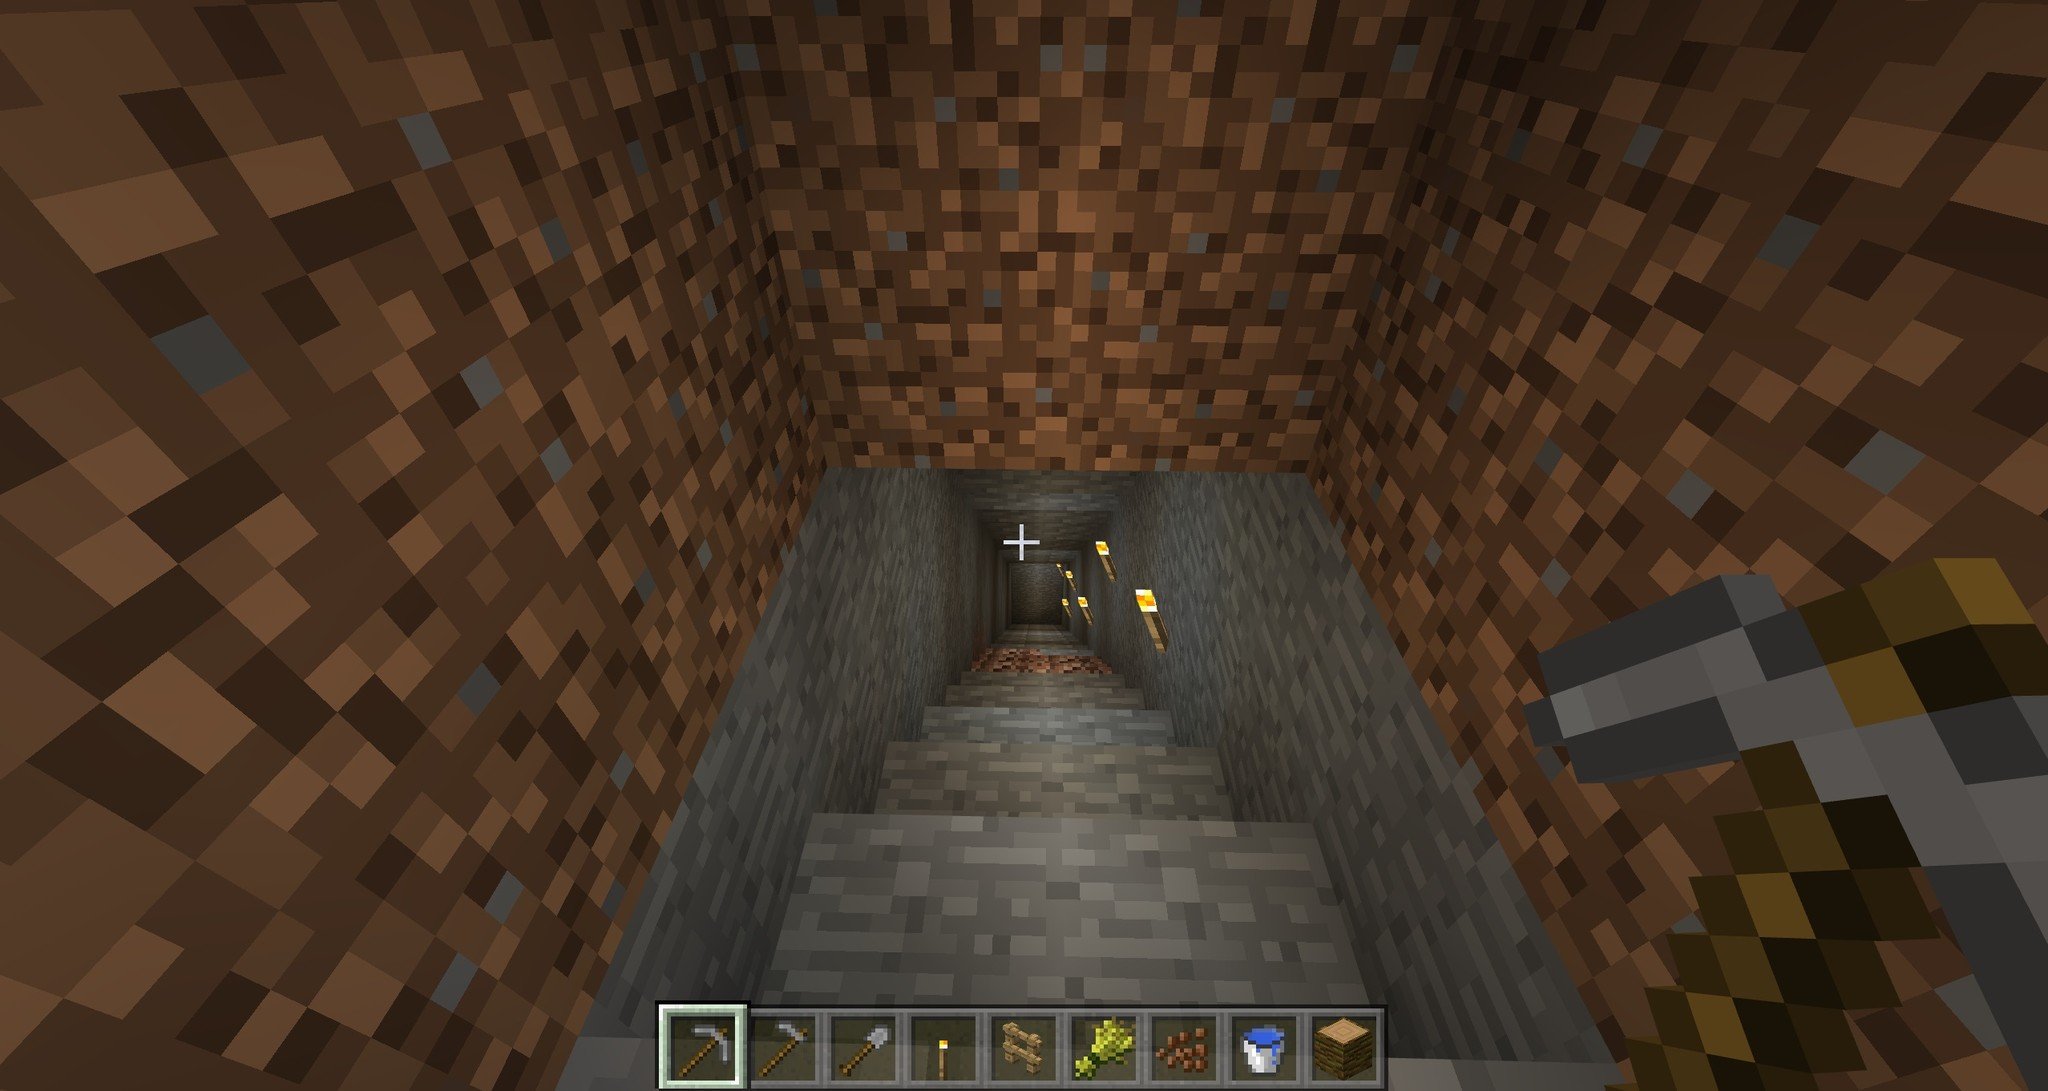
2. Strip mining
The best way to strip mine is to pick a spot in your staircase mine, and then dig straight into one of the walls. After digging for a while, pick a random spot in that tunnel and dig straight into the side again. repeat this over and over again while making sure you have enough torches and don’t get lost.
There are also other methods of mining like cave mining, quarry mining, etc but this is the safest and one of the most effective methods. Once you have Iron or diamond armor and tools, you can go cave mining, which has a better chance of getting ores but also has lots of monsters. Now onto the next step!
Step five: Crafting iron stuff
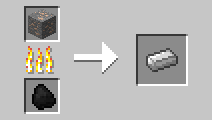
Once you have around 3 or more iron from mining, You need to smelt it in order to craft items with it. To do this, smelt it in a furnace using coal/charcoal.
Smelting iron
After smelting the iron, craft an iron pick like so:
How to craft an iron pick
An iron pick(axe) is used to mine different ores like diamond, redstone, lapis lazuli, and other ores that can’t be mined with stone tools. To know more,scroll down to the mining index. After that, you can keep mining until you have enough iron to craft the following tools: A pickaxe (if you don’t already have one), an axe, a sword, a helmet, a chestplate and some leggings. The other tools shown are optional.
Iron stuff
If you find diamond, do the same as you did with iron, except you need to mine it with an Iron pick and you also don’t need to smelt it. The crafting recipes are the same as iron tools but instead of iron, use diamond.
So now you have some iron (and potentially diamond) stuff. Here’s the mining index so that you don’t spend the rest of eternity mining obsidian with a wooden pick.
Wooden pick: Mining level 1
Gold pick: Mining level 1
Stone pick: Mining level 2
Iron pick: Mining level 3
Diamond pick: Mining level 4
Stone:Mining level 1
Coal:Mining level 1
Iron: Mining level 2
Redstone: Mining level 3
Emerald: Mining level 3
Lapis lazuli: Mining level 3
Diamond: Mining level 3
Gold: Mining level 3
Obsidian: Mining level 4
And that’s that! It was a rather short post, sorry about that, but I am trying to keep my posts as short as possible so that I can publish them at a faster rate! My next post won’t be a minecraft one, but something a bit different, And it’s coming out on the 1st of February, so stay tuned for that!
As usual, feel free to subscribe to my blog right now for free so that you never miss another one of these amazing posts. just enter your E-mail address in the home page and click subscribe! Thanks!
If you find a mistake in any of my posts or want to give me feedback on my blog, send an E-mail to ewokgamingfeedback@gmail.com
With over a 100 million downloads in less than two years and an average rating of 4.8/5 stars, it’s no coincidence that I picked this game for the first ever game review on Ewok gaming
Brawl Stars
Brawl Stars has 32 unique brawlers and more than 50 skins- all of which can be acquired in-game without making a single purchase, which means that it is absolutely NOT pay to win. It’s brawlers are divided into Trophy road, Rare, Super rare, Epic, Mythic and legendary. Now, you might think that legendary brawlers are the best, but that isn’t the case. Each brawler has their strengths and weaknesses, and that’s one of the best aspects of this amazing game.
Some brawlers like barley and tick are throwers, and can throw their projectiles over obstacles, While other brawlers like colt and penny are sharp shooters and fire a series of attacks that deal moderate- high damage. So there really are brawlers for all types of gameplay. Fighter, Thrower, Sharpshooter, Heavy weight, Healer, Batter, Sniper, Dashing assassin, Skirmisher, Support, Toxic assassin and Stealthy assassin are the different types of Brawlers.
Once you start playing, you get off to a rocky start – and have to grind for hours on end,but once you get around 500 trophies, it gets much easier and steadier
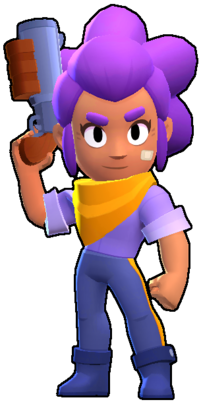
You start off with a brawler called shelly, who uses a shotgun that deals high damage at close range.
Shelly
After this you soon acquire other brawlers that suit different types of gameplay and are good at certain game modes
Speaking of game modes, this game has 7! Each of which which unlock as you gain trophies. They are:
Gem grab: grab gems from the center of the map or get them from destroying enemy brawlers while making sure no one destroys you and gets your gems. The team that lasts 15 seconds with a total of 10 or more gems wins.
Showdown: Showdown is similiar to a battle royale. In Solo mode, ten brawlers spawn on different ends of the map and have to fight it out between themselves. They can also brake crates to get power cubes which increase their health and damage dealt for that specific game. Duo showdown is the same as solo showdown, but instead of 1, there are 2 brawlers on each side.
Brawl ball: Always wished there was a game that combined action and sports? No? Well, after playing this game, you will. In Brawl ball, there are 3 players on each side and the aim of the game is to score a goal in the enemy team’s goalpost. To do this, you need to go up to the ball to pick it up, and use the attack button to kick it to your teammate or into the goalpost. But this means that you can’t fire at brawlers when you have the ball, rendering you an easy target. the same applies to the other team.
I haven’t even mentioned half of the game modes in the game, but your gonna have to discover all the others on your own because I don’t want to spoil the game for you.
Gem grabShowdownBrawl ball
From the wide range of brawlers to the constantly changing events, this game really has it all. And that is why I’m going to give this game
8/10 Stars
⭐⭐⭐⭐⭐
Rating: 5 out of 5.
⭐⭐⭐
Rating: 3 out of 5.
Supercell has really outdone them selves this time, and I’m sure they will the next time they come up with a brilliant game. That’s it for now. See ya suckers on the next post 🙂
By the way, feel free to subscribe to my blog right now for free so that you never miss another one of these amazing posts. just enter your E-mail address in the home page and click subscribe! Thanks!
If you find a mistake in any of my posts or want to give me feedback on my blog, send an E-mail to ewokgamingfeedback@gmail.com
If your sending an E-mail regarding feedback, An issue or a suggestion then set the subject to feedback, issue or suggestion respectively.
Minecraft is a truly amazing game that unleashes the creativity in you by allowing you to build anything you can imagine as well as enhances your survival skills by teaching you the basics of surviving in the wild. You begin by punching wood- and it takes off from there. From defending villages from raids to sea diving with dolphins and turtles, the possibilities are endless.
Minecraft is a truly amazing game
But we aren’t here to talk about how great Minecraft is. We’re here to tell you everything you need to know about the game- as a beginner. Here are easy steps to get you started on your Minecraft journey:
Step one: Creating your world
You may skip this if you already know how to create a world
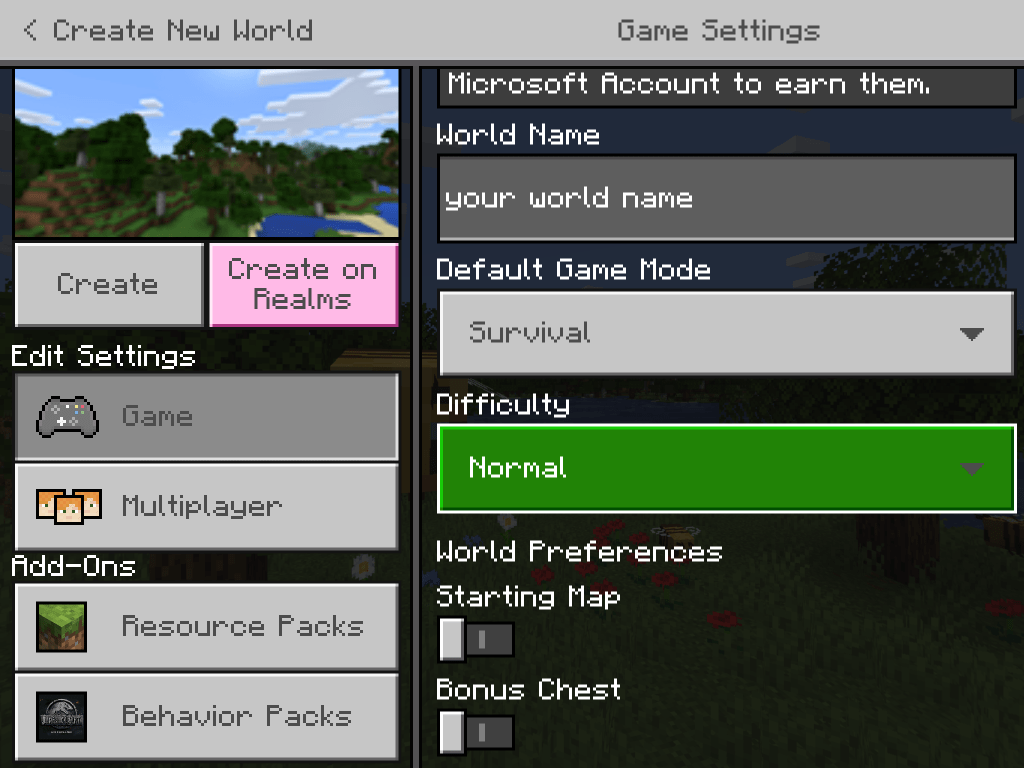
For Minecraft pocket edition (bedrock edition): In the worlds tab, press create new. In the templates tab that opens up,click on click on create new world (ignore the templates). Once you’re in the game settings page click the game option on the right. On the left, make sure that your game mode is set to survival mode and difficulty should be set on normal or easy depending on how confident you are. Starting map and bonus chest should be off.
Set the game mode to normal or easy
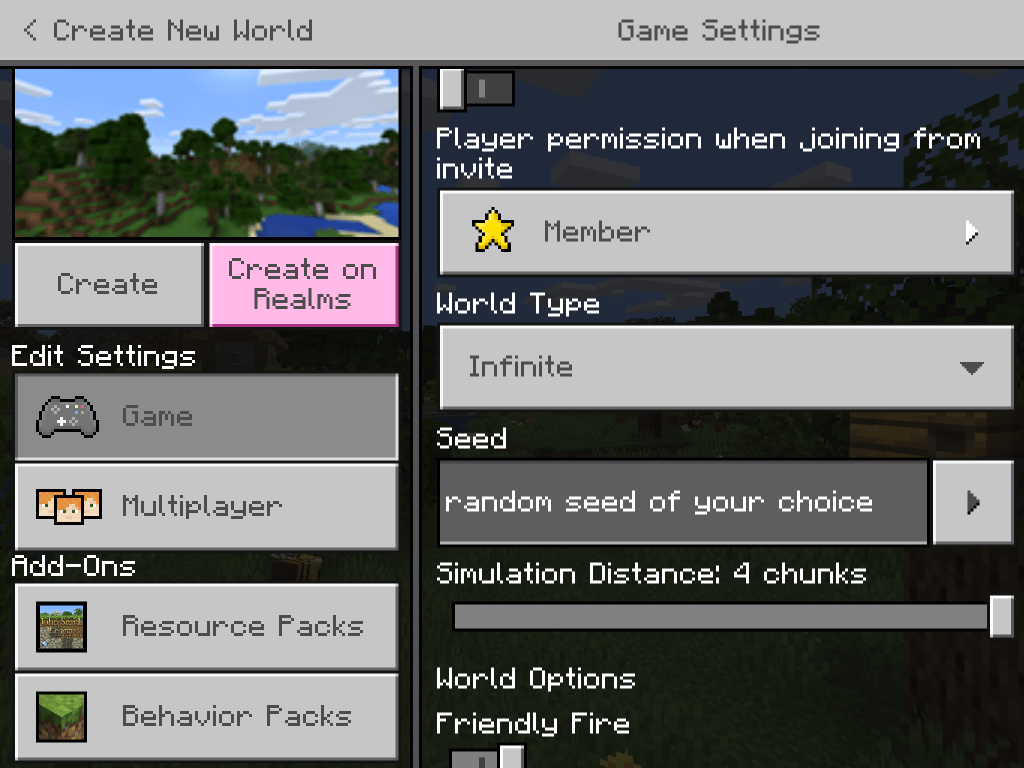
If you scroll down on the right you should see a text box that says seed. Seeds are almost like a line of code that the world generates around. For example if you put in the seed piglife101 (or any other combination of letters and numbers)in two different worlds,you would spawn in the exact same place and will have the exact same world. This way, if you want to start playing right from the start, but want the exact same world, you can just enter the seed while creating your world (it’s simpler than it sounds).
Enter a seed
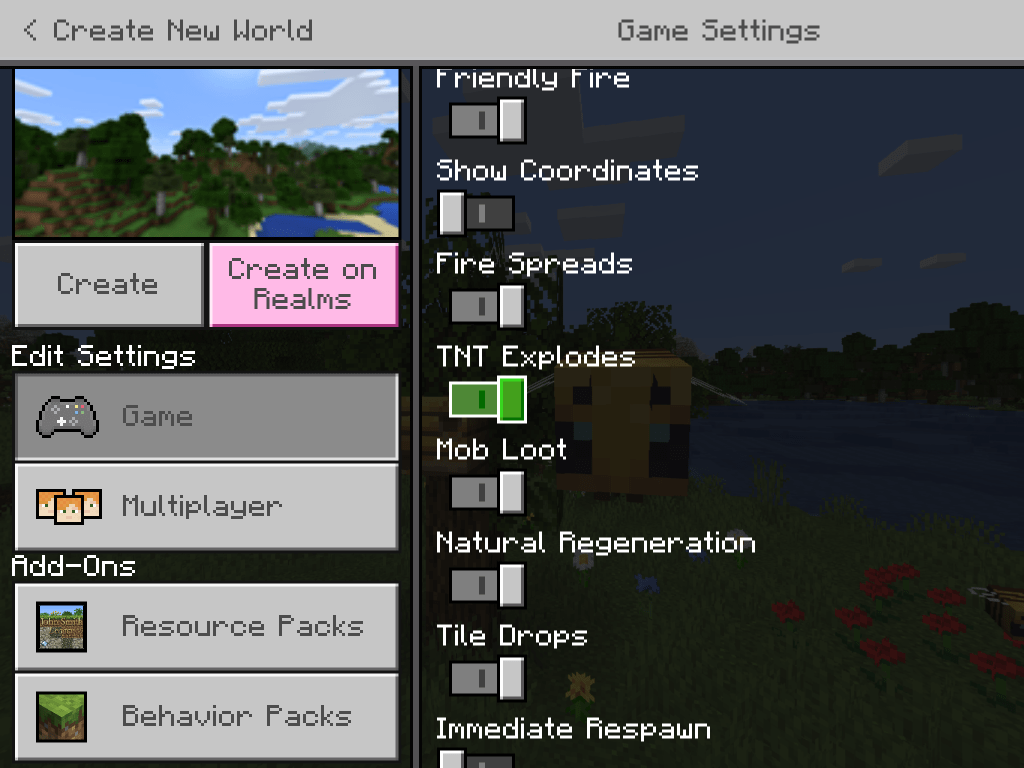
After entering a random seed, set the world type to infinite and the simulation distance to 4 chunks. Scroll down to the world options and set them as shown below:
Set the world options as shown
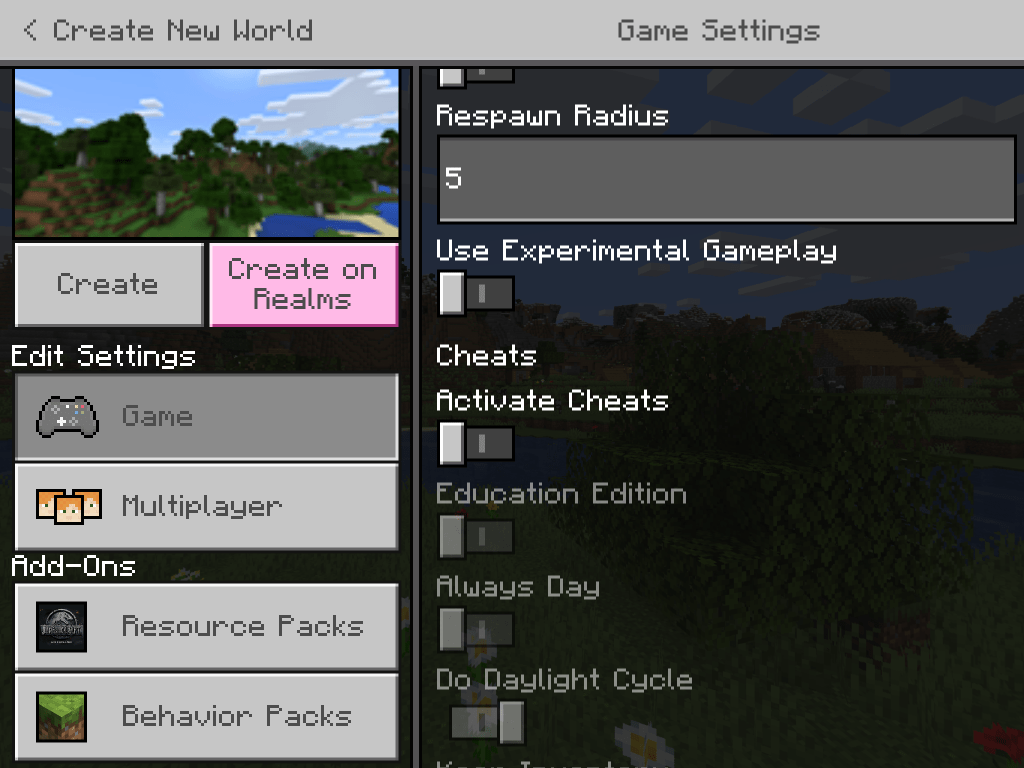
Also make sure that activate cheats is off. This is very important because if you activate cheats, your achievements will be permanently turned off (also turn off experimental gameplay to avoid glitches and bugs). Achievements are an important aspect to the game so be sure to turn off cheats.
Keep cheats off
Now that your done setting your world, click on create-and begin your minecraft journey!
P.S. If you use java edition, the layout would be slightly different and you need to make sure generated structures is on. Also some options like world options will only be available in the pause menu after you create your world. Other than that it’s pretty much the same.
Create world options for java edition
Step two: Find some wood. NOW.
This step is exactly what it sounds like. As soon as you spawn in your world you’re gonna need some wood. Just find the nearest tree and start punching it. ( left click and hold for PC and press and hold for pocket devices) It doesn’t matter which biome you spawn in- unless you spawn in a desert or an ocean. We will get to that later, so if you did spawn in an ocean, then scroll down to find out the next plan of action.
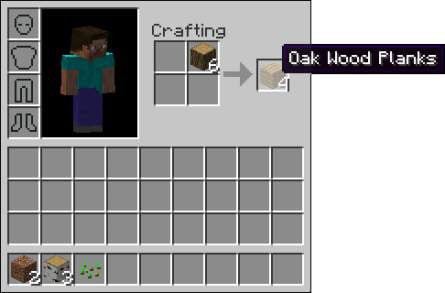
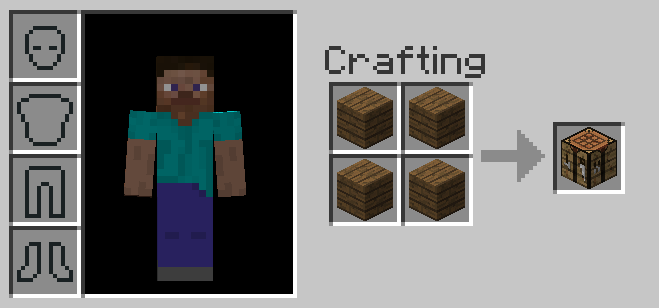
After you have a couple of logs of wood, go to your inventory (E or press the 3 dots) and craft some wood planks and then a crafting table as shown below.
How to craft woodCrafting a crafting table
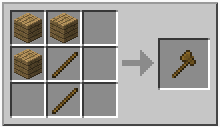
After you’ve crafted these, it’s time to craft some basic tools. Place your crafting table down and right click or tap to interact with it, then craft some sticks, followed by an axe and pickaxe…
How to craft sticksCrafting an axeAnd finally… A pickaxe
…And there you go! Now you have some basic tools! If you want, then you can craft shovel as well (if you know the crafting recipe) Now, for those who spawned in the desert or ocean…
What to do if spawned in deserts or oceans.
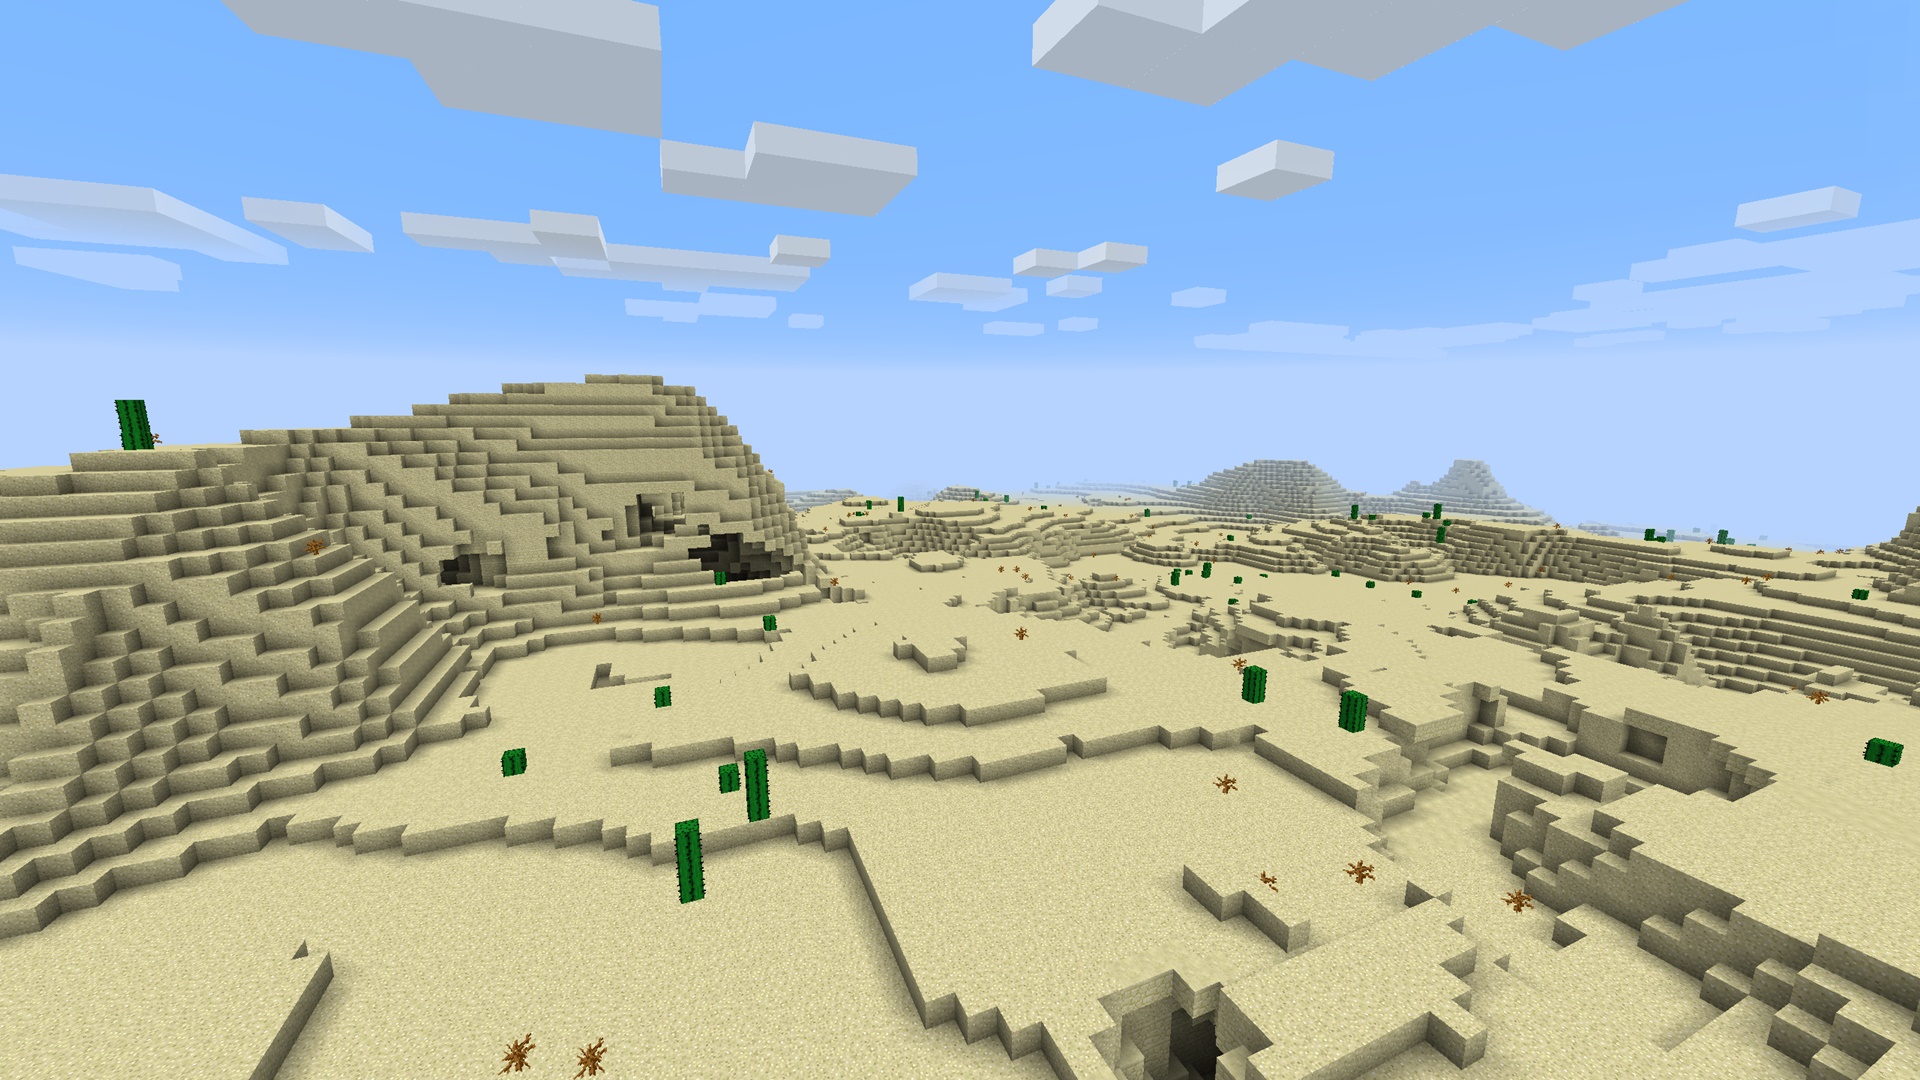
Deserts are notorious for one thing and that is; they have no trees! So if you happen to spawn in a desert; your options are limited to these:
No trees!
1. Find a way out
The most obvious solution is to try to get out of the desert, so if you can spot another biome, head that way. As soon as you’re out of the desert, you’re problems are over and you can get straight to punching wood. However, if you cannot spot another biome, then try another option.
2. Raid a village
Now, don’t get me wrong. When I say raid, I don’t mean take everything– just some basic supplies that you find in their houses or farms that are essential like food, seeds, barrels, etc. You can also trade with the villagers for other materials you may need. This is effective only when you spawn near a village or find one while trying to escape the desert.
Desert village
Another good thing about spawning in the desert is that when you break dead bushes, you get sticks, which are useful for crafting.
Dead bushes in minecraft
After you’ve escaped the desert, scroll back up to step two and start over!
P.S. If you spawned in the ocean and are a beginner, start in another world with a different seed as it’s much harder to get off to good start when your stranded on an island. Only attempt to play if you have at least ameteur experience in the game.
Step three: acquiring food and shelter
Now that you have some basic tools, it’s time for you to build a shelter. The best way to do this is to find a nice big hill, and mine into the side of it to build your base. this way you’ll have a base as well as some dirt and stone. Make sure the base is about 5×5×3with a two block entrance. (Note: if you find iron, which is an ore with orange bits on it, then do NOT attempt to mine it with a wooden pickaxe, only mine it once you have a stone pickaxe.If you find coal, though, you can mine it with a wooden pickaxe)
Find a nice hillIron oreCoal ore
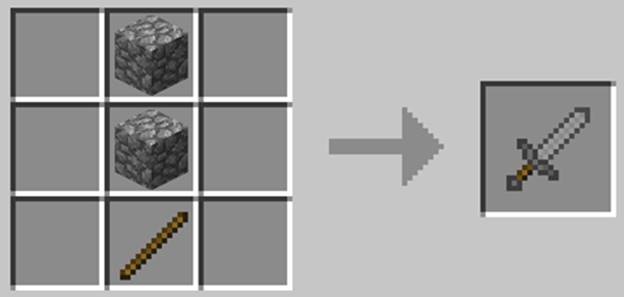
Now that you have a shelter and some stone, craft some stone tools as shown below (but do not craft a hoe which is on the bottom left)
Stone tools crafting recipesStone sword
You now have your very first sword! now it’s time to hunt some animals for food. I recommend hunting sheep as you will get mutton as well as wool for crafting a bed. Also cut down some trees while you at it (make sure to replant the saplings as well!).
A sheep
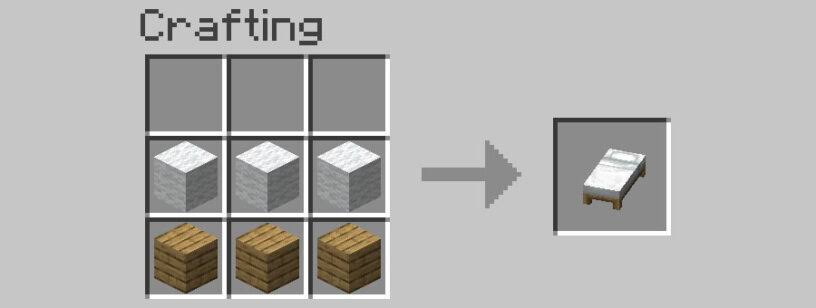
After you have 3 wool and 2-4 mutton from killing sheep, head back to base, then use your crafting table to craft a furnace and a bed as follows:
Crafting a furnaceHow to craft a bed
Place the bed and furnace down next to your crafting table inside your base dug into a hill. Then use your furnace to cook some mutton
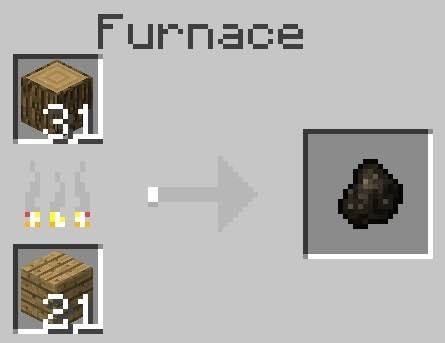
But before cooking mutton, open the furnace and put wood logs in the top right slot and wood planks in the bottom right slot. Make sure to put the same number of wood logs and planks. Wait a few seconds and collect the black substance that appears on the right
Burning logs for charcoal
After your done with that, place mutton in the top right slot and charcoal on the bottom left (1 charcoal for every 9 pieces of meat)
Once you have some cooked mutton, you can eat it by right clicking or pressing and holding. The sun should be setting by now so you should sleep in your bed.
Now you have survived your first night in Minecraft! You also acquired some basic stone tools and have a small base in minecraft! This is the end of part one of a beginner’s guide to minecraft. Be on the look out for a part two!
Also feel free to subscribe to this blog for free so that you never miss a brand new post! That’s it for this post, see you on the next one!
P.S. If you want give me some feedback or find a mistake on any of my posts, send a E-mail to ewokgamingfeedback@gmail.com regarding the issue or feedback and I will fix it ASAP.
(If you send a message regarding feedback then the subject should be feedback. If it’s an issue then the subject should be mistake and if it’s suggestions then the subject should be suggestions.)